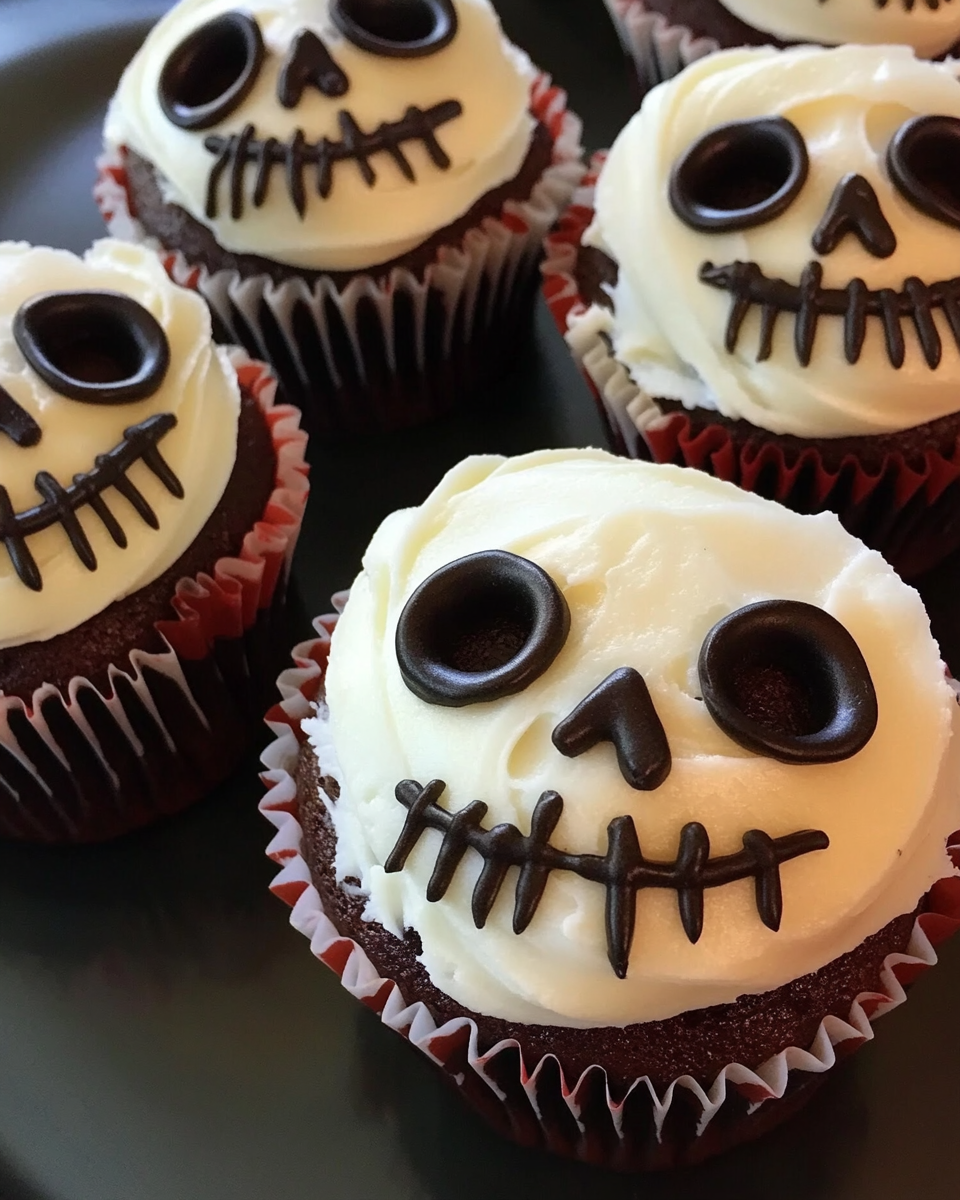
Halloween is the perfect time to get creative in the kitchen, especially with spooky and fun treats. One such recipe that’s sure to wow both kids and adults alike is Creepy Halloween Skull Cupcakes. These chocolate cupcakes are easy to make using a standard boxed cake mix and decorated to look like eerie skulls with a combination of vanilla and chocolate frosting. Not only are they delicious, but they also make an eye-catching addition to your Halloween spread. In this article, we’ll break down everything you need to know to make these creepy cupcakes at home, including a list of ingredients, step-by-step instructions, and decorating tips to create the perfect skull design. Let’s dive in and make your Halloween a little spookier—and sweeter!
Full Recipe:
Ingredients:
To make these skull cupcakes, you only need a handful of ingredients that are likely already in your pantry or easily available at the store. You can use your favorite chocolate cupcake recipe or follow the simple boxed cake mix instructions below.
For the Cupcakes:
- 1 box of chocolate cake mix (any brand)
- 1 cup of water
- 3 large eggs
- 1/3 cup of vegetable oil
For the Decoration:
- 2 cups of white vanilla frosting (store-bought or homemade)
- 1 cup of chocolate frosting (store-bought or homemade)
- Piping bags fitted with a small round tip
Step-by-Step Instructions
Now that you have all your ingredients, let’s walk through the steps to create these delightful cupcakes.
Step 1: Preheat Your Oven and Prepare Your Tins
Preheat your oven to 350°F (175°C). While the oven is heating up, line two 12-cup muffin tins with paper liners. This will ensure your cupcakes come out easily and look neat when decorated.
Step 2: Mix the Cupcake Batter
In a large bowl, combine the chocolate cake mix, water, eggs, and vegetable oil. Using an electric mixer, start beating the mixture on low speed for about 30 seconds to combine the ingredients. Then, increase the speed to medium and continue to beat for about 2 minutes until the batter is smooth and creamy.
Tip: Make sure not to overbeat the batter, as it could lead to dense cupcakes instead of fluffy ones.
Step 3: Fill the Muffin Cups
Once your batter is ready, spoon it into the lined muffin cups, filling each one about 3/4 of the way. You want to leave some room for the cupcakes to rise as they bake.
Step 4: Bake the Cupcakes
Place the muffin tins into the preheated oven and bake for 18-20 minutes. To check if they’re done, insert a toothpick into the center of a cupcake—if it comes out clean, they’re ready to go!
Once baked, remove the cupcakes from the oven and allow them to cool in the tins for about 15 minutes. Afterward, transfer the cupcakes to a wire rack to cool completely before decorating. This step is essential because decorating warm cupcakes will cause the frosting to melt and lose its shape.
Step 5: First Layer of Frosting
While your cupcakes are cooling, prepare your white vanilla frosting. Once the cupcakes are completely cool, frost each one with a thin layer of the white frosting. This acts as a base coat and helps the second layer of frosting go on more smoothly.
Tip: After frosting the cupcakes with the base layer, refrigerate them for about 30 minutes. This will firm up the frosting and make decorating much easier.
Step 6: Apply the Second Layer of Frosting
Once the cupcakes have chilled and the first layer is set, apply a second, thicker layer of white vanilla frosting to each cupcake. This is the layer that will serve as the canvas for your skull design.
Step 7: Decorating the Skull Face
Now for the fun part—decorating your cupcakes to look like skulls! Fill a piping bag fitted with a small round tip with the chocolate frosting. Here’s how to create the skull face:
- Eyes: Pipe two large ovals for the skull’s eyes near the top of the cupcake.
- Nostrils: Pipe two small dots for the nose, positioned slightly below and between the eyes.
- Mouth: For the skull’s mouth, pipe a long horizontal line across the bottom half of the cupcake, and then add small vertical lines along the line to create a stitched mouth effect.
Feel free to experiment with different facial expressions to give your skulls a variety of looks. Some can be spooky, while others can be silly or even angry!
Tips for Success
- Consistency of Frosting: If your chocolate frosting is too thick, add a little bit of milk or cream to thin it out for smoother piping. If it’s too thin, add some powdered sugar until it reaches the right consistency.
- Piping Practice: If you’re new to piping, practice on a piece of parchment paper before you start on the cupcakes. This will help you get comfortable with the pressure and control needed to create even designs.
- Make Ahead: You can bake the cupcakes a day in advance and store them in an airtight container at room temperature. Frost and decorate them on the day of your event to keep them fresh.
Storage and Serving
Once decorated, the cupcakes can be stored in an airtight container at room temperature for up to two days. If you want to keep them for longer, store them in the refrigerator, though this might cause the frosting to harden slightly. For best results, remove them from the fridge and let them come to room temperature before serving.
These cupcakes are perfect for Halloween parties, school events, or as a spooky surprise for your family and friends. They’re not only fun to look at but also taste delicious, with a rich chocolate flavor complemented by the sweet vanilla and chocolate frosting.
Conclusion
Creepy Halloween Skull Cupcakes are a delightful way to add a spooky touch to your Halloween celebrations. With just a few simple ingredients and a bit of creativity, you can whip up a batch of these cupcakes in no time. The combination of moist chocolate cupcakes and decorative skull faces makes for a fun and festive treat that’s sure to impress both kids and adults alike.
Whether you’re hosting a Halloween party or simply want to enjoy a spooky treat with your loved ones, these cupcakes are a fantastic choice. Their eerie yet fun appearance is guaranteed to be a hit, and the delicious taste will have everyone reaching for seconds. So, grab your ingredients, get your piping bag ready, and let your inner artist come out this Halloween with these Creepy Halloween Skull Cupcakes!

